While Bluehost does support a webmail service, most of us still enjoy much more to have all your email on a local computer, with multiple devices, meaning you will have to set it up using imap settings.
The main reason for using Bluehost imap settings is that any changes that are made on the server will be in sync with your webmail and other IMAP-connected email clients.
Note that usually IMAP is limited to 20 connections per IP address, but that shouldn’t be an issue for most users.
CHOOSE THE BEST PROFESSIONAL EMAIL PLAN FOR YOUR BUSINESS
Setting up Bluehost IMAP email with Apple Mail
For the purpose of this article we will explain the process of setting up your email application with Bluehost IMAP settings with Apple Mail:
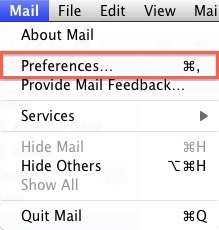
- Open your email application, and from the Mail menu choose Preferences.
- Then click on Accounts, and click on the Plus icon in the bottom left hand corner to initiate a new email account.
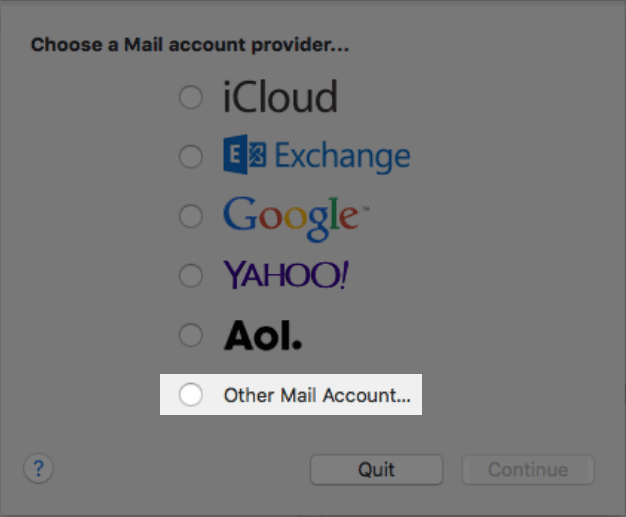
- In the Mail account provide choose Other Mail Account.
4. Enter your first and last name, as well as password, and click Next.
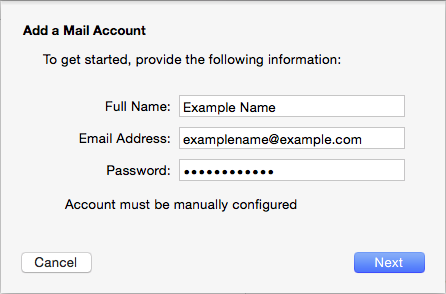
5. You will be notified that “Account must be manually configured”, and click Next.
5. In the Incoming Mail Server Info choose IMAP and enter the mail server address and password.

6. Next, you will need to enter the Outgoing Mail Server (SMTP) setting.
7. Click the Server Settings button and you will be prompted to further configure your Outgoing Mail Server.
8. Enter the Outgoing Mail Server again.
9. Choose your Server port:
10. Choose Password for Authentication.
11. Re-enter the full email address as the User Name, and the password for that email account.
12. Click the OK button when finished.
At this point your new email account should be added to your Apple Mail client.
Information needed to setup BlueHost IMAP settings
Notable informations that are used through the setup process are:
- Username – Your email address: [email protected]
- Password – The password for that email account.
- Incoming Server – mail.example.com*
- Incoming Port – 993 (IMAP) or 995 (POP3)
- Outgoing Server – mail.example.com*
- Outgoing Port – 465 (SMTP)
- Authentication – Password
*Replace example.com with your domain name.
Having SSL with your email?
Furthermore, if you choose to use an SSL you will receive a warning message that the certificate is not trusted. In this case:
- Click the Show Certificate button.
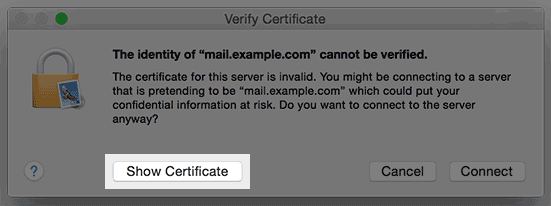
2. Check the box to Always trust the certificate.
3. Click the Connect button.
Setting up Bluehost IMAP email with Thunderbird
The process of setting up a Bluehost IMAP email with Thunderbird email client is relatively similar as, again, you need to create a new account and enter the other information:
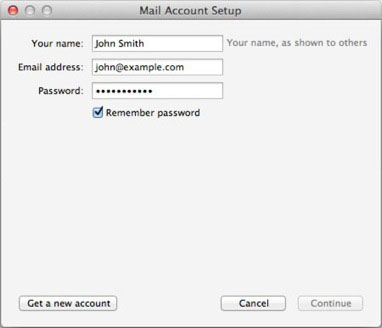
- Open Thunderbird email application
- Navigate to the File > New > Existing Mail Account in the main menu.
- In the Mail Account Setup enter the following information:
- Your Name: Your full name, as you want it to appear on your outbound mail.
- Email Address: The email address you’re setting up.
- Password: The password for your email account.
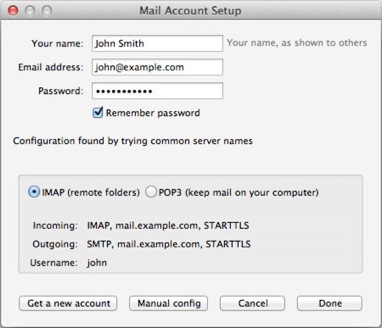
4. Be sure to check the Remember Password box, and then click Continue.
5. Now wait as the Thunderbird will look up the configuration files for your email account (if it finds them then it will set up your email account automatically).
6. If the automatic setup did not go through, then you will see Configuration found at email provider or a similar message. If not, you’ll see the Manual Config menu.
7. Choose IMAP and click Manual Config.
8. Next, change the incoming and outgoing server to mail.example.com (replacing example.com with your domain).
It will select IMAP without SSL settings by default. For IMAP with SSL*, change the following settings:
Incoming Port: 993, Outgoing Port: 465, SSL: SSL/TLSAuthentication: Normal password
9. Click Re-Test
10. Click Done.
Mozilla Thunderbird is one of the most popular free email software so we felt that we must include it.
Hope this article has helped you with setting up BlueHost IMAP settings.
